
Welcome to CROAI Documentation
Everything you need to get started with A/B testing and website optimization
What is CROAI?
CROAI is a complete website optimization platform that helps you test different versions of your content to see what converts better. Simply point and click to select elements on your website, create variations, and let our system automatically determine which version performs best with your visitors.
Installation and setting up your first variant typically take 5 minutes or less, from start to finish.
How CROAI is Different
Unlike traditional A/B testing tools, CROAI brings intelligence and accessibility to website optimization:
AI-Powered Optimization
Our AI goes far beyond what human testers could manually create, continuously generating and testing new variations to push your conversion rates to their maximum potential. While you sleep, CROAI is finding optimization opportunities you never would have thought to test.
5-Minute Setup
From installation to launching your first variant takes about 5 minutes. Our intuitive point-and-click interface means no technical expertise required - just select what you want to test and go live.
Installation
Get CROAI up and running on your website through the portal
Step 1: Add Your Website in the Portal
After signing up for CROAI, you'll start in the portal dashboard. Here's how to add your first website:
Adding a Website:
- Click the "Add New Website" button in your dashboard
- Enter your website URL (must be HTTPS + root domain or subdomain)
- Optionally add a conversion page URL (e.g., thank you page, success page)
- Click "Next" to proceed to script installation
Step 2: Install the CROAI Script
The portal will generate a custom script for your website. Copy and paste this script into your website's <head> section:
<script>
// CROAI
!function(){var e=document.createElement("style");e.id="croai-antiflicker",e.innerHTML="html { visibility: hidden !important; transition: none !important; } body { visibility: hidden !important; }";var n=function(){var e=document.getElementById("croai-antiflicker");e&&e.parentNode&&e.parentNode.removeChild(e)};document.head.appendChild(e);var t=setTimeout(n,2000);document.addEventListener("croai:ready",(function(){clearTimeout(t),n()})),window.CROAI_ANTIFLICKER={show:n}}();
</script>
<script async src="https://croai.com/croai.js"></script>
Installation Steps:
- Copy the complete script from the portal
- Paste it into your website's <head> section
- Save and publish your website changes
- Return to the portal and click "Verify Installation"
Step 3: Verify Installation
The portal will automatically verify that the script is installed correctly on your website:
Verification Process:
- The portal fetches your website content
- Checks for the CROAI script tag in the head section
- Verifies proper script placement and accessibility
- Confirms your website is ready for optimization
If verification fails, double-check that:
- The script is placed in the <head> section
- Your website is live and publicly accessible
- The website URL is correct
Step 4: Add Pages for Testing
Once your website is verified, you can add specific pages to optimize:
Adding Pages:
- Click "Add New Page" in the Pages section
- Enter the page path (e.g., "products", "checkout", or leave empty for homepage)
- Optionally set a conversion URL specific to this page
- Click "Next" to configure page elements
Step 5: Configure Elements for Testing
Use the visual DOM editor to select elements you want to test:
Element Selection:
- The portal loads your page in an embedded viewer
- Click on any element (headlines, buttons, text, images) to select it
- Create different text variations for each selected element
- Use AI suggestions or create manual variants
- Save your configuration and go live when ready
You can switch between desktop and mobile views to ensure your tests work across all devices.
JavaScript Installation
Install CROAI on your website
Basic Setup
CROAI works automatically once installed. Just add the script tag to the head of your website:
<script> // CROAI
!function(){
    var e=document.createElement("style");
    e.id="croai-antiflicker";
    e.innerHTML="html { visibility: hidden !important; transition: none !important; } body { visibility: hidden !important; }";
    var n=function(){
        var e=document.getElementById("croai-antiflicker");
        e&&e.parentNode&&e.parentNode.removeChild(e)
    };
    document.head.appendChild(e);
    var t=setTimeout(n,2000);
    document.addEventListener("croai:ready",(function(){
        clearTimeout(t),n()
    }));
    window.CROAI_ANTIFLICKER={show:n}
}(); </script>
<script async src="https://croai.com/croai.js"></script>
Shopify Installation
Install CROAI on your Shopify store using an app
Recommended Method: Using ScriptInjector App
The easiest and safest way to install CROAI on your Shopify store is by using the ScriptInjector app.
Recommended App:
- ScriptInjector - Free app for adding custom scripts to your store
Installation Steps
- Go to the ScriptInjector app in the Shopify App Store
- Click "Install" and follow the installation process
- Open the ScriptInjector app from your Shopify admin dashboard
- Add a new script and paste the CROAI script code (shown below) into the header section
- Save the changes
- The script will now be automatically included on all pages of your store
Script Code
Copy this script and paste it into the ScriptInjector app:
<script> // CROAI
!function(){
    var e=document.createElement("style");
    e.id="croai-antiflicker";
    e.innerHTML="html { visibility: hidden !important; transition: none !important; } body { visibility: hidden !important; }";
    var n=function(){
        var e=document.getElementById("croai-antiflicker");
        e&&e.parentNode&&e.parentNode.removeChild(e)
    };
    document.head.appendChild(e);
    var t=setTimeout(n,2000);
    document.addEventListener("croai:ready",(function(){
        clearTimeout(t),n()
    }));
    window.CROAI_ANTIFLICKER={show:n}
}(); </script>
<script async src="https://croai.com/croai.js"></script>
WordPress Installation
Install CROAI on your WordPress website using plugins
Recommended Method: Using WordPress Plugins
The easiest and safest way to install CROAI on WordPress is by using a plugin that allows you to add custom scripts to your site's header.
Recommended Plugin:
- Header Footer Code Manager - Free plugin with advanced script management
Installation Steps
- Go to Plugins → Add New in your WordPress admin
- Search for "Header Footer Code Manager" and install it
- Activate the plugin
- Navigate to the plugin's settings (usually under Settings or Tools)
- Look for "Header Scripts" or "Scripts in Header" section
- Paste the CROAI script code (shown below) into the header section
- Save the changes
- The script will now be automatically included on all pages of your website
Script Code
Copy this script and paste it into the Header Footer Code Manager plugin:
<script> // CROAI
!function(){
    var e=document.createElement("style");
    e.id="croai-antiflicker";
    e.innerHTML="html { visibility: hidden !important; transition: none !important; } body { visibility: hidden !important; }";
    var n=function(){
        var e=document.getElementById("croai-antiflicker");
        e&&e.parentNode&&e.parentNode.removeChild(e)
    };
    document.head.appendChild(e);
    var t=setTimeout(n,2000);
    document.addEventListener("croai:ready",(function(){
        clearTimeout(t),n()
    }));
    window.CROAI_ANTIFLICKER={show:n}
}(); </script>
<script async src="https://croai.com/croai.js"></script>
Debugging Issues
Troubleshooting and debugging CROAI integration
Debug Mode
If you are experiencing an issue with CROAI, you can enable debug mode to get detailed information about what's happening.
How to Enable Debug Mode:
- Ask your developer to add
?croai_debug=trueto your website URL - Open the browser's developer tools (F12 or right-click → Inspect)
- Go to the Console tab
- Refresh the page and observe the console logs
Debug mode will provide information about:
- Verbose console logging showing the variant selection process
- Test ping events sent for verification
- Element registry initialization (even when no variants are found)
- Detailed information about which variants are being considered and selected
- API communication and errors
Example Debug URL:
If your website is https://example.com, use:
https://example.com?croai_debug=true
For pages with existing parameters:
https://example.com/products?category=shoes&croai_debug=true
Share the console output with our support team to help diagnose and resolve any issues quickly.
FAQs
Frequently asked questions about CROAI
Will CROAI affect my site's SEO?
No, CROAI will not negatively impact your site's SEO. Our optimization techniques are designed to be search engine friendly and maintain your existing SEO performance.
What is the minimum traffic required to see results?
You can see results with as little as 100 unique visitors per month.
How does CROAI impact site performance?
CROAI is optimized at the edge (nearest to your customer which means it loads from over 330+ data center cities globally (across 120+ countries).) This results in minimal impact on your site's performance.
Do I have control over the content changes on my site?
Yes, you have full control over all changes. You can enable or disable auto AI mode for any variant, and all changes require your approval unless you specifically enable automatic deployment.
Which platforms and frameworks does CROAI support?
CROAI supports all platforms and frameworks, including Shopify, WordPress, and any other website platform. Our JavaScript-based solution works universally across all web technologies.
How do I implement a winner?
Winners are automatically implemented when identified by our system. Once a statistically significant winner is detected, it will be deployed to all your visitors automatically.
Team Management
Collaborate with your team members
Adding Team Members
Invite team members to collaborate on your optimization projects:
- Go to the Team section in your dashboard
- Click Add Team Member
- Enter their email address and select their role
- Choose their access level (all websites or specific ones)
- Send the invitation
Role Types
Admin
Full access to all features, can manage team members and billing
Team Member
Can create and manage tests, view analytics, but cannot manage team or billing
View Only
Can view test results and analytics but cannot create or modify tests
Access Control
You can control which websites and pages team members can access:
- All Access: Team member can work on all websites in your account
- Limited Access: Restrict access to specific websites or pages
Page Editor
Visual editor for selecting and modifying website elements
What is the Page Editor?
The CROAI Page Editor is an intuitive visual interface that allows you to select and modify any element on your website without coding knowledge. Simply point, click, and customize elements like headlines, buttons, and text blocks directly from within your browser.
Key Features:
- Point-and-click element selection
- Real-time preview of changes
- Desktop and mobile view modes
- No coding or technical knowledge required
- Instant visual feedback

How to Use the Page Editor
Using the Page Editor is straightforward:
- Select which website you want to work on
- Navigate to your page in the portal (or add a new page)
- Click "Configure Elements" to open the editor
- Your website loads in the embedded viewer
- Click on any element you want to optimize
- The element will be highlighted and added to your elements list
- Switch between desktop and mobile views as needed
- Click the "Save" button to save your work without going live. Click the "Save & Go Live" button when you're ready to deploy your changes live on your own website.
Variant Modification
Create and manage multiple content variations with AI assistance
Creating Content Variants
Once you've selected elements using the Page Editor, you can create multiple variations of your content to test which performs best. Our system supports both AI-generated suggestions and manual variant creation.
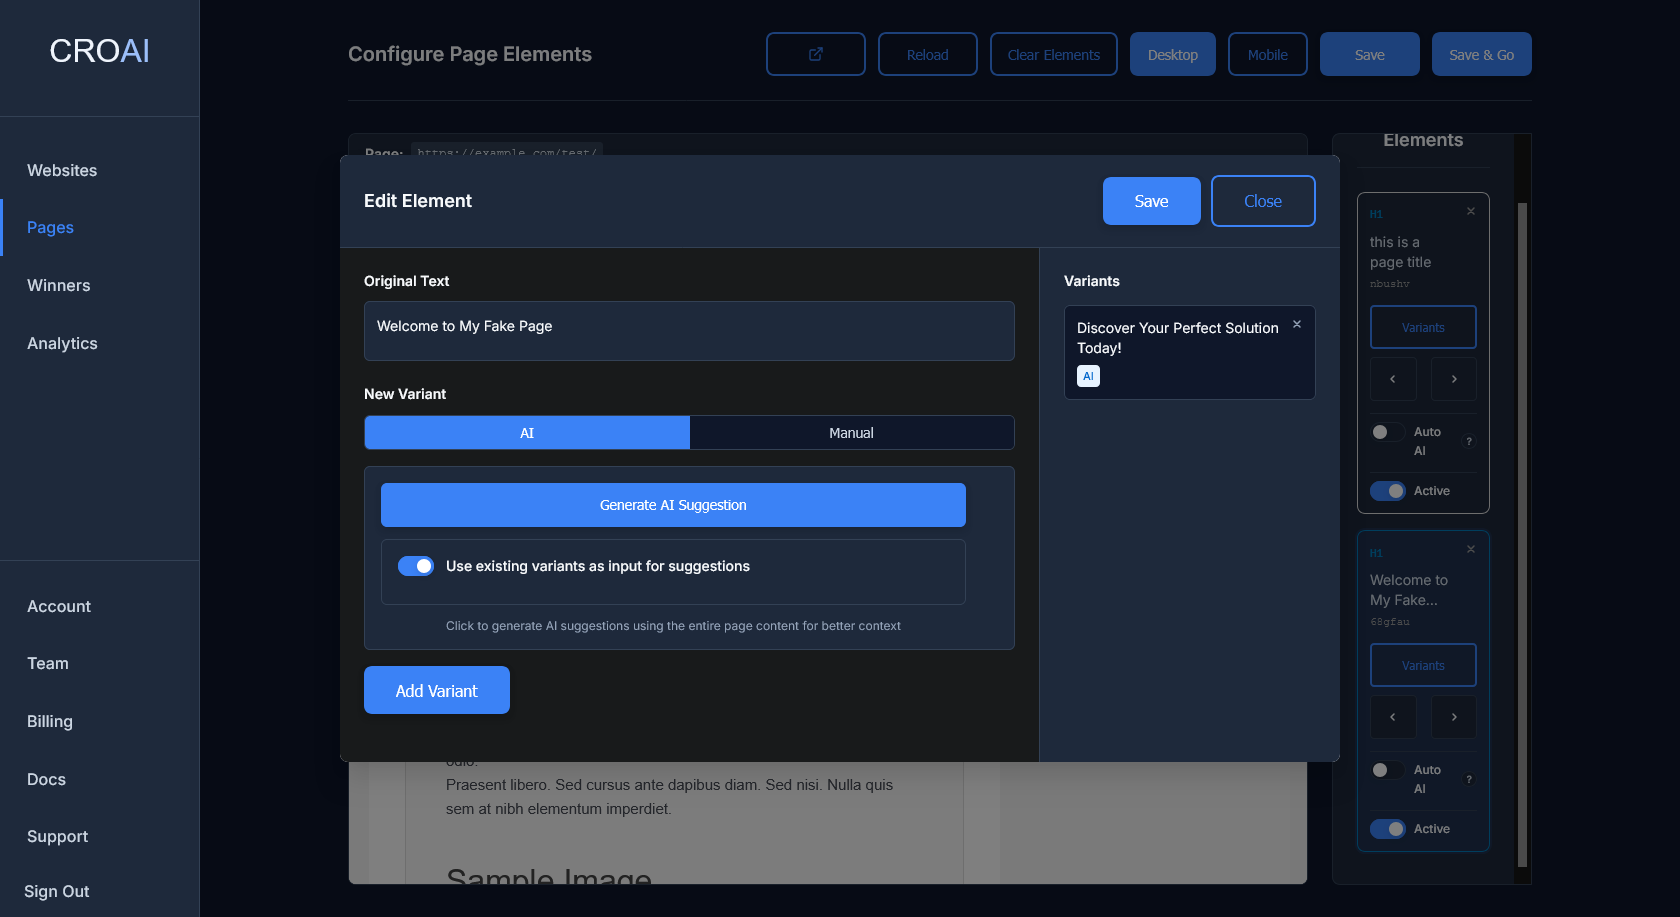
AI-Generated Variants
Our AI analyzes your page content and visitor behavior to generate compelling alternative versions:
AI Features:
- Context-aware suggestions based on page content
- Performance-optimized copy
- Multiple variant options for each element
Manual Variant Creation
For complete control, you can also create variants manually:
Manual Features:
- Choose "Manual" variant type
- Enter your custom text or content
- Add multiple variants for the same element
Auto AI Mode
Fully automated AI-powered optimization that runs continuously
What is Auto AI Mode?
Auto AI Mode is CROAI's fully automated optimization feature that continuously generates, tests, and deploys new content variations without requiring manual approval. When enabled, the AI takes complete control of the optimization process, allowing your website to improve itself 24/7.
Key Benefits:
- Completely hands-off optimization
- Continuous improvement without manual intervention
- AI learns from your audience and adapts automatically
- Faster optimization cycles than manual testing
- No need to monitor or approve changes
How Auto AI Mode Works
When Auto AI Mode is enabled for an element, the system follows this automated process:
AI Analysis
The AI analyzes your page content, existing performance data, and visitor behavior patterns to understand what resonates with your audience.
Variant Generation
Based on the analysis, the AI automatically generates new content variations designed to improve engagement and conversions.
Automatic Testing
New variants are automatically deployed and tested against the current best-performing version using our statistical analysis engine.
Winner Deployment
When a statistically significant winner is identified, it automatically becomes the new baseline, and the cycle continues with new variations.
Iteration Limits
To ensure optimal performance and prevent excessive changes, Auto AI Mode operates with built-in safeguards:
5-Iteration Limit:
Auto AI Mode runs a maximum of 5 iterations at a time before automatically stopping. This ensures:
- Controlled optimization pace
- Time for meaningful data collection between changes
- Prevention of over-optimization
- Opportunity for manual review of results
After 5 iterations are completed, Auto AI Mode will pause, allowing you to:
- Review the optimization results and performance improvements
- Analyze which variations performed best
- Manually restart Auto AI Mode if you want to continue optimization
- Make manual adjustments based on the learnings
Enabling Auto AI Mode
Auto AI Mode can be enabled at the element level when creating or editing variants:
How to Enable:
- Select an element in the Page Editor
- Create at least one AI-generated variant
- Toggle the "Auto AI Mode" switch for that element
- Save and go live with your configuration
- The AI will automatically begin the optimization process
Monitoring Auto AI Mode
While Auto AI Mode runs automatically, you can still monitor its progress:
What You Can Track:
- Current iteration number (1-5)
- Performance improvements over time
- Which variants the AI has tested
- Statistical confidence levels
- Overall conversion rate improvements
Best Practices
When to Use Auto AI Mode:
- High-traffic pages: Where you have sufficient data for quick iterations
- Stable content: On pages where the core message won't change frequently
- Hands-off optimization: When you want continuous improvement without manual oversight
- Established baselines: After you've done some initial manual testing
When to Use Manual Mode:
- Brand-sensitive content: Where every change needs approval
- Low-traffic pages: Where iterations would take too long
- Experimental campaigns: Where you want to test specific hypotheses
- New pages: Where you want to establish a baseline first
Safety and Control
Auto AI Mode includes several safety mechanisms to protect your brand and user experience:
Built-in Safeguards:
- Content filtering: AI-generated content is filtered for appropriateness
- Brand consistency: Variations maintain your brand voice and style
- Performance monitoring: Automatic rollback if performance degrades
- Iteration limits: Maximum of 5 iterations before requiring manual restart
- Statistical validation: Only deploys statistically significant improvements
You can disable Auto AI Mode at any time by toggling it off in the element settings. Any active tests will complete their current cycle before stopping.
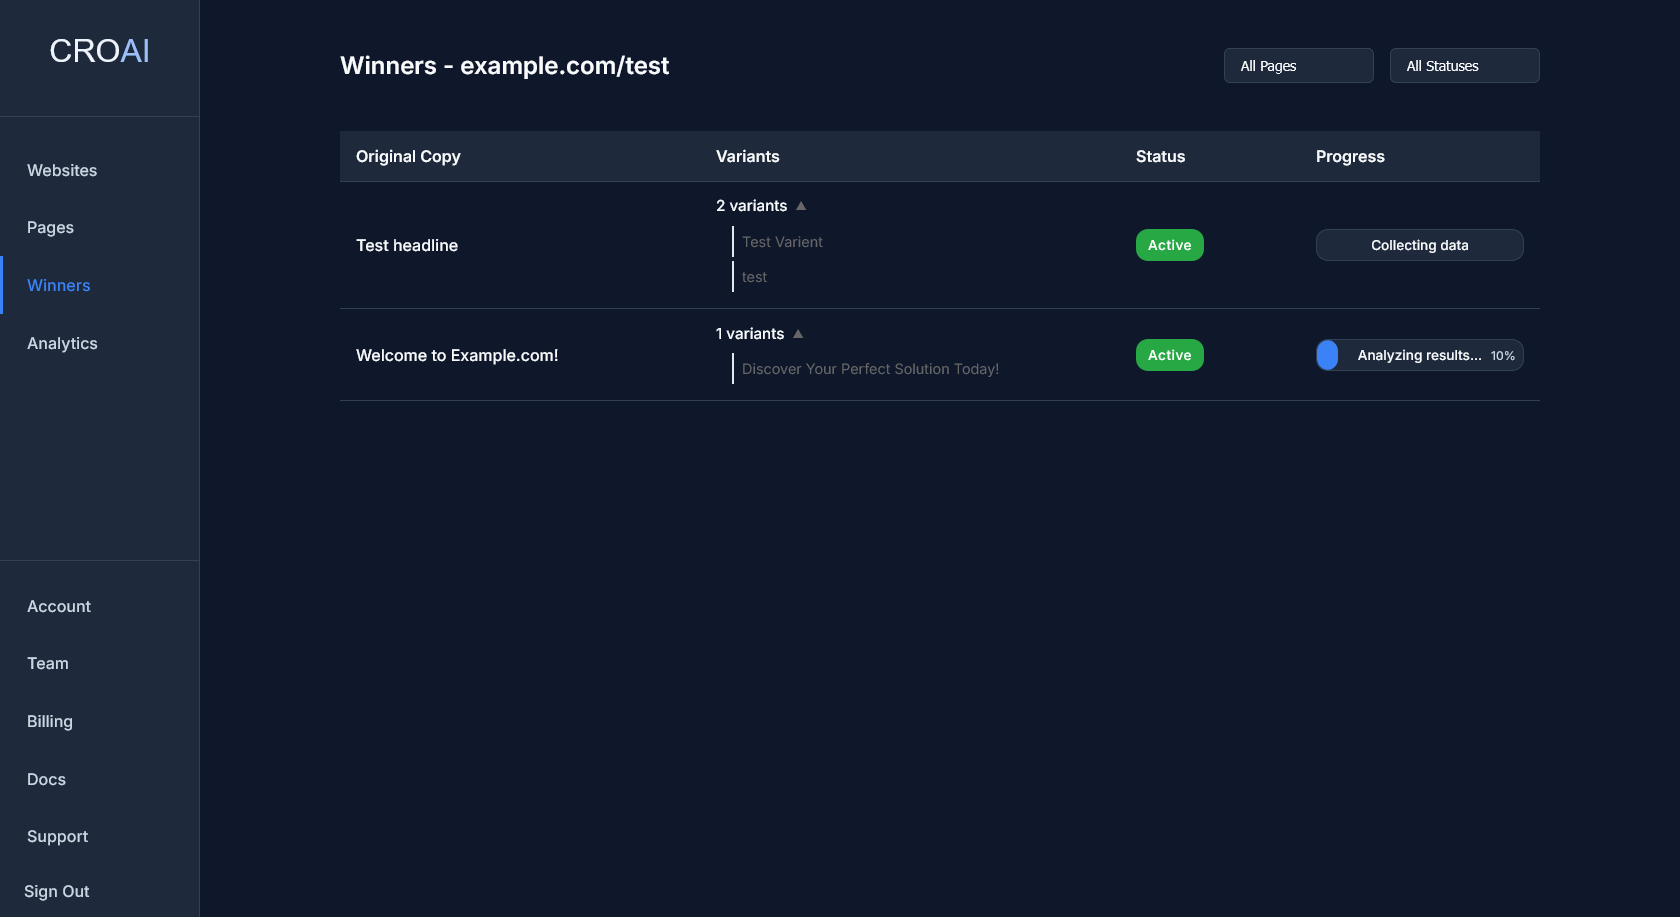
Winners
Track successful optimizations with detailed performance analytics
Winners Dashboard
The Winners dashboard provides comprehensive insights into your most successful optimizations, showing which variants are converting best and driving the highest revenue impact.
A/B Testing
Intelligent automated testing that finds winners for you
How CROAI A/B Testing Works
CROAI's A/B testing system automatically analyzes your test results and determines winners using advanced statistical methods. No manual monitoring required - our system tracks all visitor interactions and conversions, then uses machine learning to identify the best-performing variants.
The Process is Simple:
- Our specialized software tracks all events (page loads, clicks, scrolls, conversions) in real-time
- We then analyze these events frequently using statistical models
- Results are automatically stored with winner identification and confidence levels
Test Lifecycle Stages
Your dashboard displays different status messages throughout the testing process. Here's what each stage shows:
Engagement-Based Testing
How CROAI determines winners without conversion tracking
Testing Without Conversions
CROAI can find meaningful winners even when you don't have conversion tracking set up. Our intelligent system automatically falls back to engagement-based analysis, measuring how users actually interact with your content to determine which variants perform better.
When Engagement Testing Activates:
- No conversion page URL is specified
- No explicit conversion events are being tracked
- No CTA elements are properly tagged on your page
- You want to optimize for user engagement rather than just conversions
How CROAI Measures Engagement
Our system tracks four key engagement metrics to build a comprehensive picture of how users interact with each variant:
Scroll Depth
How far users scroll down your page. Higher scroll depth indicates users are consuming more of your content and finding it engaging.
Time on Site
How long users spend on your page. Longer visits typically indicate greater interest and engagement with your content.
General Clicks
Total number of clicks and interactions. More clicks suggest users are actively engaging with your page elements.
CTA Interactions
Clicks on call-to-action elements, even if they don't lead to conversions. These indicate high-intent user behavior.
Engagement Score Calculation
CROAI combines these metrics into a single engagement score using proven statistical weighting:
The Formula:
Engagement Score = (Scroll Depth × 0.3) + (Time on Site × 0.3) + (Clicks × 0.2) + (CTA Clicks × 0.2)
Each metric is normalized to a scale of 0-1, ensuring fair comparison across different traffic levels and user behaviors. The weighted combination provides a comprehensive view of user engagement that often correlates strongly with conversion potential.
Statistical Analysis
Engagement-based testing uses the same rigorous statistical methods as conversion testing:
Winner Determination:
- Bayesian Analysis: Uses probability calculations to identify the best-performing variant
- Stability Checks: Winners must remain consistent over time to avoid false positives
Practical Example
Let's say you're testing two headline variations on a blog post:
Test Results:
Original: "10 Tips for Success"
- Average scroll: 45%
- Average time: 2.3 minutes
- Average clicks: 1.2 per visitor
- Engagement Score: 0.52
AI Variant: "The Success Secrets Nobody Tells You"
- Average scroll: 78%
- Average time: 4.1 minutes
- Average clicks: 2.8 per visitor
- Engagement Score: 0.73
Result: AI variant wins with 40% engagement improvement and 95%+ statistical confidence.
Benefits of Engagement Testing
Why This Works:
- Universal Application: Works on any page, regardless of conversion setup
- Real User Interest: Measures genuine engagement rather than just traffic
- Leading Indicators: Engagement often predicts conversions before they happen
- No Setup Required: Automatically activated when conversion tracking isn't available
- Statistical Rigor: Same confidence levels as traditional conversion testing
Best Practices
Optimizing for Engagement:
- Content Quality: Focus on headlines and copy that genuinely interest your audience
- Page Structure: Design layouts that encourage scrolling and exploration
- Interactive Elements: Include clickable elements that provide value to users
- Mobile Optimization: Ensure engagement metrics work well on mobile devices
- Loading Speed: Fast-loading pages improve all engagement metrics
When to Use Each Method
Understanding when to use engagement-based vs conversion-based testing:
Use Engagement Testing For:
- Blog posts and content pages
- Brand awareness campaigns
- Early-stage funnel optimization
- Pages without clear conversion actions
- Building audience engagement
Use Conversion Testing For:
- Sales pages and checkout flows
- Lead generation forms
- Product pages with clear CTAs
- Email signup optimization
- Revenue-focused testing